

cannonball
-
Posts
4295 -
Joined
-
Last visited
Content Type
Profiles
Forums
Downloads
News
Everything posted by cannonball
-
MAP10 - “Creeping Death” The first half of the map prior to hitting the one switch required to reach the final room is pretty dull and can be mostly dispatched without too much worry, then you get an archvile teleports into a very unfortunate position to revive a pair of mancubi and then of course the final room that bares some teeth (Though the BFG is handed to you to deal with this). The second half certainly provides thrills compared to the rather sleepy initial phases, overall this one was okay.
-
If you are doing your mapping outside, wear sunscreen. Aside from that, there are very few objective rules when it comes to mapping, only poor execution of said ideas. Just boot up the map editor of your choice and build what you want to build. The doom community is a bunch of weirdos wonderful people so there will be at least someone (If not many more) who will connect and enjoy what you make.
-
MAP09 - “Bleed Me an Ocean” Like others, this one offers every weapon up to and including the plasma gun right near the start and the secret BFG is also right near the start. Funny thing is that the map clearly sets up for something that never actually arrives (The midi choice makes this even worse because of the first map to use this midi), the opposition is on paper weaker and less optimised than many of the maps prior to this. As such the gameplay feels a little limp and too easy to blaze through, not to mention there is a greater than normal level of backtracking from the blue key to the blue door that can be reached right from the get-go. Oddly given the layout there is clearly scope for connecting the yellow key door and the blue key doors together that could have allowed better maneuverability for both player and monsters alike. In the end the map isn't bad, but the one so far that feels like a bit of a mis-step in terms of achieving what it wants to achieve.
-
Need rum, I repeat, we need more rum. I never expected that one of the cutest doom wads of all time would get a sequel. Congratulations!
-
MAP08 - “Neurotica” A lot of lowering monster closets in this one, in fact a lot of this map recycles the same type of idea. The map plays fine though, there are a couple of corridors where the lights have been placed awkwardly and the light level is a little too high for my liking as the flesh textures work best in a dimly lit or high contrast environment. That said the combat is pretty solid and end fight offer a little bit of resistance. A solid map but not one of my favourites so far.
-
MAP07 - “A Fine Day To Die” The progression works here because the map is short and compact, it also encourages the player to hurtle through it because you will need to visit each little section twice, first for the key it holds and then the bars that require one of the other three keys. The combat is absolutely fine, fun and quite frenetic, however no deaths were sustained. Yeah it uses some dead simple tropes but it is quite nicely disguised by the key hunt, I will say that the Map07 slot seems to be a reliable source of fun maps, and this one was no exception.
-
MAP06 - “Spirit Crusher” A solid map with a decent amount of excitement due to a larger number of threatening monsters. There are a few too many barons here and the mastermind could have been utilised a little more, but overall this was a fun map to play and the archvile lead encounter was the highlight alongside the tougher start.
-
MAP05 - “Poison Godmachine” Visually clean and technically solid, this map feels a little too by the numbers, the only real difference between this and the last map really was that the last map left more of an impression with sharper traps and the nukage felt like a proper obstacle, here everything sort of exists, the difficulty in the map unravels if you find the secret SSG at the start. A fine but forgettable map.
-
MAP04 - “Pull the Plug” Whilst there isn't much novel about sewer maps, it is hard to argue that this map isn't well executed and the weapon/ammo distribution allows for a rather quick run time. There appearance of revenants and the first archvile are a very welcome addition of spice to the combat, resulting in a brisk but more engaging experience. The best map so far.
-
MAP03 - “Illuminatus” The first 30 seconds are definite a jolt of energy, sadly the map kind of peters out after this hot start. Now I guess I should take some blame for not really utilising the rockets I had, but honestly I was expecting more than what actually came. Instead we have quite a few hellknights that are more of a chore to kill than being any threat (You might as well have had imps or hitscan), the red key trap isn't too hard to dismantle either. Overall this was okay and clearly plays better once you know what is coming and take a more aggressive playing style.
-
MAP01 - “Dragonaut” Short, simple and frankly rather forgettable, this is probably not to disimilar to many other efforts of making a classic Map01. There really isn't too much to talk about and frankly it would be entirely hypocritical to have many complaints here because I along with many others have made maps like these. MAP02 - “Under the Surface” Another easy map, though I suspect the acquisition of the SSG lifts the flow of the map to something that was fun to blast through. The only difficult point was that darn hellknight in the exit room, I was not jumping off that ledge so ate a couple of shots, and then I jumped off to find the rest of the secrets. This was far more fun than Map01.
-

DooM II Map Interpretation Project (Slots Open)
cannonball replied to Abandoned_Account's topic in WAD Releases & Development
I think you are over stating the difficulty of building something original whilst understating the difficulty of tweaking very abstract maps from the IWads. The definition of "original" is very subjective and you would be surprised at how obvious it is to spot a map from well known mappers for example. It sounds like you are having difficulty getting from concept to a finished map (From your musings on here), so I would definitely suggest facing this and seeking advice because I cannot help but feel that this project will fall on its face quite quickly at the present time. You clearly want to get involved in the community and make stuff, but again it will be much better for you to get through the barriers that are stopping you from finishing stuff because the same logic could apply to, for example managing this project. The community has spread out significantly over the past few years and there are several discord servers that I think you would find useful (Entryway, Pineapple under the sea (PUSS) to name a couple. -
Atomic [Limit Removing] - Development thread
cannonball replied to cannonball's topic in WAD Releases & Development
A quick update, in short I have managed to make two more complete maps, just a quick image of both for now. Map13 - The Wall Map14 - Crimson Mass Luckily both were fairly short maps (despite the scale of the areas shown). Map15 is planning to be bigger though and at this point the secret maps are essentially ideas in my head at the moment. But fingers crossed that I can continue to make progress with this. -
I will say this now, as I am finally back from holiday. The idea isn’t owned by anyone and certainly not by myself. I have hoped that at some point that someone might decide to give Final Doom the same treatment as Doom 2 and The Ultimate Doom but this was something I haven’t really wanted to do myself. So in that sense there are no issues with this; However I do have concerns regarding experience and the potential direction/travel of this project, you are pretty new here and I certainly think that you might need to present some credentials in regards to your experience in doom mapping and your general vision of how the TNT levels will be represented in this project. Best of luck with this, if this project does get of the ground.
-
Rate my church?
-
Two Poog or not to poog, that is the question.
-
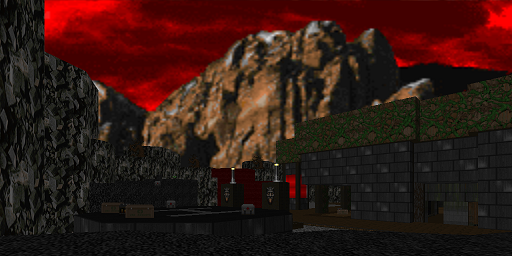
Resuming Atomic development, at least for now the aesthetics will lean towards the Doom/Doom 2 vision of hell so a touch of technological influence amidst the Hellscape. This section of the mapset will involve traversing a hellish Citadel rather than jumping from map to map via teleporters etc. First stop, scaling the outer wall (Still very much work in progress but this at least shows the vertical scale for this map nicely).
-
The DWmegawad Club plays: Eviternity II
cannonball replied to dobu gabu maru's topic in WAD Discussion
Overall thoughts; It is fair to say that a sequel to Eviternity was on most peoples wishlists, a wad that many considered to be the greatest wad of all time. I must confess that I was never in that crowd, sure it was good but I think I gelled with some other wads more than the original. However I will say here now that I consider Eviternity 2 to be one of the greatest megwads ever made and a fantastic advert for both the expanded OTEX texture pack (Public release pending) and MBF21. At its core the level and combat design is rock solid with maps ranging from good all the way through to potentially legendary status. The themes are varied and never outstay their welcome and the poetic lore that flows through this wad seems so natural. In terms of the episodes; 1st - I think the downfall of Heaven was an excellent setting to start this one, especially after the novel setting in the last episode of Eviternity. I loved Tristan's reprise of Elysium, the sombre aftermath of your previous campaign. It was the perfect tone setter and the following maps flows smoothly and offered engaging combat whilst keeping the difficulty on the easy side. The final map was the highlight of this episode. 2nd - This episode I considered to be the weakest, but only just, there were some very good maps in here and a mix of mapping styles (Bri and An_Mutt with more of a dungeon crawler aspect compared to the more open offerings of the other mappers), I will say that this episode housed the best secret map of the set, so a touch of redemption here. 3rd - The Brutalist episode is the one that could easily end up being bland, but I consider it to be the strongest of the lot, there are two outstanding maps and the rest fill in the gaps perfectly, as I said during this playthrough, but I don't know whether it was deliberate to start the episode in the lush colourful outdoor environment and end it in a bleak, poisonned concrete wasteland, but that adds a lot to the sense of journey in this one. 4th - Whilst this episode didn't have any blockbuster maps, this episode felt the most consistently good, this also housed in my opinion Dragonfly's best map. I think the autumn/historical setting was a great counter to the concrete jungle of the previous episode. 5th - This one started a little low-key (I was expecting the maps to kick on a little bit), but there was a great pay off in both Maps23 and 24 and the boss map was ironically the best in the set (ironic in the sense that the layout was the simplest of the entire set). 6th - A bit of a strange one and I have to question whether the pacing and difficulty was right for this episode, that said the four maps up to the final boss were all of high quality and never outstayed their welcome. Overall, this is a must play for anyone who loves Doom, and a great present to celebrate the 30th birthday of a fantastic game. I think the difficulty plateaus a little too much and the last episode could have been a little tougher overall. The final boss was considerably better than the boss of the first megawad. Overall Score - 4.5/5 Favourite maps - Map11 (the best technically), Map14 (A wonderful map to just wander around in), Map24 (One of the greatest cinematic moments ever). Essentially there were all A+ maps. Honorable mentions - Map01, 05, 15, 18, 19, 20, 23, 29 and 32, like above all of these are grade A maps, which should reflect how positive I feel about this. I am on holiday for a chunk of next month so consider me out of next months campaign. -
The DWmegawad Club plays: Eviternity II
cannonball replied to dobu gabu maru's topic in WAD Discussion
MAP36 - “Kenosis” by ukiro Well we all knew what was coming, a massive map where the combat is contained within separate structures arranged around a heptagram. The fights within map map vary from being rather slow and some awesome encounters. Unfortunately I went for the SSG island first, now imagine having to slow roll the astralcacos/nightmare demons and revenants, this wasn't overly fun and I was fearing the worst at this point, things didn't get better in the next room where you get the rocket launcher, a point blank archvile and 3 more on lifts that again require slow killing or leaving and hopeing you don't get zapped, finally you can lower the lifts once to climb to a switch and then a second time to access the outside area with the rocket launcher, now finally I can have some fun.... The next area I went to was the chaingun frenzy, luckily I had carry-over rockets from the previous fight, so the archviles wer not an issue, after this you can go unusually nuts with the chaingun, pretty easy and quite fun to play around with. This also gives you the yellow key, following this ws the first highlight, the plasma gun area with the rotating crusher circle that starts off with a cyberdemon and some mancubi before revealing some Dukes of Hell where you need to duck in and out of the central room, great stuff. The next fight for me was the red key room, not much to say, the fight is a little on the silly side but the most difficult bit was the archviles and revenants in the corners that were awkward to kill. After grabbing the red key you face a awkward and tense standoff around the perimeter with some veiled imps that can easily catch you off guard, especially as rockets are you only source of ammo aside from a few shells dotted in the cubby holes. The final room is a line of sight hell mixed with a platform you need to steadily rise to gain access the the plasma gun and exit with the blue key, this one isn't too bad but it would be nicer if the cyberdemon killing floor was more obvious as I killed the first before the final jump. So now we can enter the sanctuary, There are three initial fights, one of which is harder than the others in my opinion, the section with the large set of stairs was the hardest as you need to be quick to beat the wall of revenants on each pass whilst slowly whittling everything down, the fight on the opposite side is easy and beatable in one attempt. The last section in the flesh pit was another highlight, a maze with a central column of archviles that restrict your movement, the initial hell knights are easy but things get tougher as you hit the switches, luckily each switch has a megasphere to help you out. I don't know whether this was intentional but some of the archviles did escape and had to be dispatched (It was like two or three with severely depleted health). Now the final fight is open, I simply rushed past the annihilators and proceeded on the the perforator fight, now that was something else, the build up and reveal is a piece of artistic horror and I was surprised how well balanced this fight was, I was fearing that the archviles would be too numerous and as such could result in a quick death but actually things played out very well, downing the final necromenace reveals one last wave of archviles, a pair of masterminds and a cyberdemon by the exit jump. This was an exhausting map, now I believe the map is more open ended that I first envisaged and as such probably brought some of the more painful moments on myself. That said some fights here were better than others with some real spectacular moments, I will say that I wasn't overly wowed by the visuals (I think this was more personal taste, I think it is more the grey sky here than anything else), the map has some very large periods of traversing the quiet outdoor area. I do wonder whether the map could have been squashed a little bit whilst keeping the various wings intact. At least getting 100% kills shouldn't be too much of a bother this time as the fights are self contained and as such missing something is quite difficult. I don't think this will rank in my favourite maps, but this wad is worth more for having this, just like Ukiro's map in Eviternity. A solid challenge and I think there are elements for everyone in this one. MAP30 - “Cosmology” by Dragonfly I have never been a big fan of one or one boss fights in Doom, purely because Doom relies quite a bit on facing multiple threats. However I will say that the boss itself isn't too bad, though the third wave can get very hairy given the boss can move around like the Veiled imp. There is quite a bit of variety in the attacks, which means you need to be aware and able to counter in the right manner to avoid being hit. I think the first wave is a little too easy and the final wave can quickly ruin you, even when on full alert. I will however say that the bits between the boss fights isn't that great. In fact it is a little tedious to slowly grind ground astral cacodemons and then the nightmare variety after part 2. They don't pose much of a threat if you are on the move so this felt like prolonging the fight without any payoff. In the end this was certainly better than the final map of Eviternity, and the boss itself is pretty well done and the arena looks great. However I don't think this can stop this from being close to the bottom of the pile, though I will say this is nowhere near the D/F grade range. MAP37 - “Credits” by Dragonfly A nice place to relax after the last couple of maps, though you are stuck here unless you can find some hidden switches to reveal a cute but deadly fight and the final text/end screens. Full overall review tomorrow.... -
The DWmegawad Club plays: Eviternity II
cannonball replied to dobu gabu maru's topic in WAD Discussion
MAP29 - “Maelstrom” by Dragonfly The monster count suggests another fairly short map, however despite how far we have gone, I still think this draws a lot from the likes of Plutonia, the map might have a fairly modest monster count but every monster makes its mark here and the astral cacodemons really run havoc at times here. The blue key was by far the easiest to grab, two cybers aren't that much of a bother, especially if you can draw a couple of other monsters to where you drop in and distract one of the goats. The other keys involve a lot of flyers and they can cause real havoc as there is nowhere to hide. Once the keys are grabbed, reach the central building and exit, no questions asked. The secret exit involves finding two secret fights, one that is pretty darn perilous is found on the yellow key path, it involves a necromenace, imps and hell knights that will be repeatedly revived to the point where you wonder whether you will make it out with any ammo. Target that menace like your life depends on it, the other fight accessed by doing some island hoping was nowhere near as stressful, you have another necromenace but this time the other monsters are perched and easily avoidable. Overall despite my initial fears, this one delivers a pretty impressive penultimate map experience, it is tough and probably tougher than the other maps in this episode (By a small margin), the scenery is imposing and foreboding and the midi just reeks of that penultimate map essence. I will play Map36 tomorrow. -
Atomic [Limit Removing] - Development thread
cannonball replied to cannonball's topic in WAD Releases & Development
I thought I would give a brief update into this; Not a lot has gone on in the mapping department (As such there are 12 maps in total). The reasons for this are mostly being distracted by other projects and general confidence in the direction of this project and what I wanted to achieve. In the end the aim was for something that bridged the more classic stuff of Plutonia/AV and more modern design ideas. As such a bit of fiddling has gone on in the background to try and give this wad a bit of personality before ploughing on with a Hell episode that will focus more on traversing a hellish city before the latter sections descend into some kind of abstract nonsense. So I thought I would leave the latest version here with a changelog mostly consisting on background features. Essentially this is a proof of concept before hopefully moving forward with this, wherever the end destination will be. https://www.dropbox.com/scl/fi/pc7x01y6d80tedr7y4ub3/atomic28124.wad?rlkey=awqhla8tdp2jluunlmzj49wku&dl=0 Changes; Lost soul - health dropped to 50hp Cacodemon - Uses the toxic cacodemon sprites, is faster and more dangerous than your garden variety cacodemon. As a trade off the health has been lowered a touched to make this a guaranteed kill with 2 rockets/SSG shots. Hellknight - Replaced by dark imp (As in Almistice, or Uprising or any others that make this trade). Essentially faster but has lower health. Baron Of Hell - Uses some redundant SS Nazi frames to deliver a double attack. Arachnorb - Replaces the commander keen (Essentially uses the same frames as the iteration in Hardfest 2). The cyberdemon and chaingunners have green colourations but are unchanged in all other factors. As a placeholder there is a recoloured version of the Speed of Doom status bar, I will whip up something original at some point that doesn’t suck like the effort I made for Concerned/Return to hadron. The maps themselves have been tweaked here and there based on feedback and general personal feelings, not to mention the later incorporation of the arachnorb into the maps. -
The DWmegawad Club plays: Eviternity II
cannonball replied to dobu gabu maru's topic in WAD Discussion
MAP28 - “Afterimage” by Velvetic It is quite strange to think that my experience deviated so strongly from others because I had no ammo issues whatsoever. I think finding the BFG was probably one of the major reasons for this because that allows you to rush the Necromenace at the end, which I guess would be the reason for blowing all of the cells in the map. This map is short, despite the grandeur of the environment it is simply a central hub, two key wings and the exit fight takes place in the central area with the uphill path to the exit. I guess there are three complaints to this map, the first is some very rude astrocacos allow the blue key path that are there in front of the door, they gotcha'ed me good. The second is that hitting the two key switches literally unlocks the exit to the point where you can with nifty footwork avoid the final fight entirely, the final one is more a subjective one and I think this has also affected others here, I think I was expecting more punishment and given the map length I think the author could have got away with cranking the mean-ness just a little bit. That aside the combat is fun, I especially liked rushing the start and getting the rocket launcher and plasma gun quickly and allowing everything to stir together, I guess this aggression may have also helped on the ammo front. I will say that despite some of the scenes in Map26, I think this map is the looker of the episode, the decision to provide verticality to this map was a great call, it makes the scene more grand than it actually is. Another solid map that was possibly a little on the easy side, again a subjective note on my part, though a few tweaks could have made this a real highlight moment. -
The DWmegawad Club plays: Eviternity II
cannonball replied to dobu gabu maru's topic in WAD Discussion
MAP27 - “Emypreal” by DMPhobos, Dragonfly A bit more to the point than the other two maps by DMPhobos, there are quite a few fights that actually require the player to use patience, in instance where you are handed a pretty awful scenario but simply dodging projectiles, ducking from archviles and waiting for the next move to present itself is the best option. The start is nasty and due care is need to keep out of sights of the two archviles, once the walls lower you can skip onto the next area, by the time I returned the only two monsters left were the archies that were weakened heavily. Both keys require a series of fights to reach your objective, the one that beings in the small maze was the better of the two (The climbing set piece on the other one is kind of cool, but also little irritating and I guess the author/playtesters agreed because this one seemed to let players off too easily). The final fight i the hardest in the map and when presented with the start of the fight you will commit a potentially check-mating mistake, with the exception of the corporals on the ledges, don't engage with everything else because it is likely that anything you put down will be instantly resurrecting upon the arrival of the Necromenace, once he arrives I found the best thing to do was to draw everything to one side, grab the key and escape to allow a better vantage point to kill said Necromenace, once dead the rest is pretty easy to dispatch and you are free to leave the map.... But hang on, there is a switch that is easy to miss, hit that and you get an optional fight that doesn't really seem to serve a purpose, it is also easier than the final fight so it isn't really an optional brutal challenge, I could simply put down everything with rockets. The only guess is that the fight was calibrated so much in the players favour that you would likely leave with 200% health, a green armour and lot of ammo. This was a bit odd. Overall this was solid and fun, though in a wad like this that gets you a middling position in the map rankings. -
The DWmegawad Club plays: Eviternity II
cannonball replied to dobu gabu maru's topic in WAD Discussion
MAP26 - “Myriad” by Tristan Clark, Guardsoul, Dragonfly Given we have Tristan at the helm, it is no surprise to see that this map is full of gimmicks. However despite the large monster count, the mandatory progression is quite simply one fight, what is cool is that the player has the option to partake in short challenges that will make said fight easier. Destroy - A two shot cyberdemon challenge essentially, however you do get a little ammo leeway and you have to jump to the cyber platform, which of course risks you being hit in mid air with very little chance of avoiding it. Conceal - A neat idea but I found the final section a little on the annoying side because you can easily end up with the archviles standing in positions where concealment is basically impossible, however given you can get through the first two relatively safely and there is health at the end, then I guess this wasn't too bad. Passage - A tribute to last call? No death penalty for a mistake and the passage lighting up the way it does is pretty cool. However the cyber seemed to lack the cutting edge threat as there are to many spots where he cannot hit you. Silence - This was a fairly lengthy but coll set piece where you needed to stand on a sky flat to shoot without waking anything, there is one switch where this isn't possible and here you have to run like heck to avoid the nightmare cacodemons. There are a few roaming monsters in the lower section that can hassle you and one switch is for a lift, so be on the look out. Endure - Heh, this has been done before as well, this time Map26 from Skulltiverse, essentially a short version of that where you are reduced to 1% health and need to navigate zombiemen, imps and could of lost souls and finally a chaingunner at the end. This was obviously less frustrating than said example, it is supposed to be a short set piece after all. Evade - This one is pretty easy, just saunter around the perimeter of the island you are on, basically make sure that you keep to a steady pace and you shouldn't take damage, the damaging floor is a bit of a wildcard because obviously bad timing can whittle your health down quickly. So the main event takes place in a large arena that frankly wouldn't look out of place in the likes of Elementalism or Age of Hell, the detail is jaw-dropping. However like others I got some tremendous frame rate issues when the party really got going. Now honestly if you complete all of the side quests then the fight isn't too difficult. However the another new monster is introduced here and I am on the fence a little, they are very aggressive and carry some nasty attacks, this also means that the player can struggle to be aggressive when the scales tip in your favour, as such getting the final kills was a little slow. After the fight you just need to traverse the rocky terrain to gain access to the next map. Overall this one is a real straight out of the left field map, it is tough but funily enough if you play this right then the map isn't too brutal. I actually like that this is the opener, it feels like some kind of dimensional hub that you would find before delving deeper into this unknown realm. The map has some real jaw dropping visuals, though the combat and challenges are a little more out there, so I can see some not enjoying elements of this one. Despite the fact that this map has flaws, it brings a lot to the table and enhances the variety and depth of the megawad a a whole. -
The DWmegawad Club plays: Eviternity II
cannonball replied to dobu gabu maru's topic in WAD Discussion
MAP25 - “Boreas” by Dragonfly This one feels like a bit of a tech demo for the Necromenace, the start is a simple SSG shootout with some imps before entering a small arena, you will first face this new monster on its own and then again a second time later. The death of the first Necromenace hails the arrival of fodder and some revenants/hellknights, now at this point you are wondering what the fuss is about because this map is potentially one of the easiest of the wad, however the Necromenace's second arrival shows that like the archvile, he can resurrect stuff, which turns this second wave into a bigger challenge, though most of the damage I took was chip damage from hitscanners that got continuously resurrected. Once this is over the exit opens up with one archvile and some demons, not too tough as long as you don't spend your ammo during the earlier fights. I was quite close to declaring this as the worst map in the set because it is just a very short arena map, however the new monster justifies its existence and actually creates a reasonably interesting set piece. Add the this some other context then this is probably pitched reasonably well, though I feel that this could have been made tougher given the mapslot and during of the map. Overall not too bad.